TourCue Organizer Portal
Welcome to the TourCue organizer portal — your complete workspace for planning, managing, and running organized road tours. This guide walks through every tab and feature so you can get your event up and running quickly.
Quick Start
- 1
Create an organization
From the left sidebar, click Organizations → New Organization. Give it a name (your club, chapter, or company).
- 2
Create a tour
Inside your organization, click Tours → New Tour. A tour is a multi-day event like a weekend road trip or an annual rally.
- 3
Add a segment
Inside the tour, click Add Segment. Each segment is one day's drive — a point A to point B route with its own cue cards and participants.
- 4
Build the route
Open the segment and click the Route tab. Search addresses to add waypoints, then save the route.
- 5
Share with drivers
Click the Share & QR Code tab. Display the QR code at your driver's meeting or send the link via SMS.
- 6
Run the simulation
Before the event, use the Simulation tab to verify every cue card fires correctly.
The organizer portal is only accessible to registered organizers. Participants join via the QR code or link — no account required on their end.
Portal Layout
The portal has a persistent left sidebar for navigation between organizations, tours, and segments. When you open a segment, the main area shows a row of tabs — each tab manages a different aspect of the event. The tabs are:
Event Details
The Details tab is where you configure the basic information for a segment. This is the first thing to fill out when creating a new event.
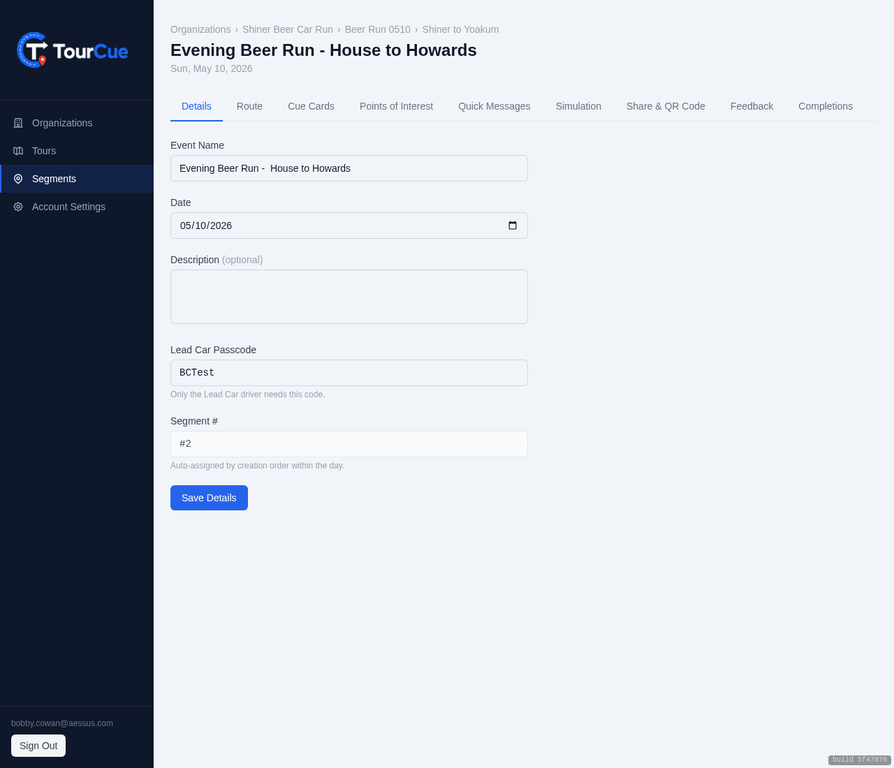
Fields
The name of this leg of the tour. Shown to participants on their screen (e.g., "Day 1 — Austin to Fredericksburg").
The date of the event. Displayed on the participant's route screen.
Optional notes shown to participants — parking instructions, meeting point details, or any pre-drive information.
A short code (e.g., BCTest) that your Lead Car driver enters in the app to claim the Lead Car role. Keep this private — only share with your designated Lead Car navigator.
Auto-assigned based on the order within the tour. You can reorder segments in the tour view.
Your event name and description are saved to a local draft automatically. If you accidentally close the tab, your work is preserved — a "Draft restored" banner will appear when you return.
Saving
Click Save Details to persist changes. An amber dot appears on the Details tab label when there are unsaved changes. If you try to navigate to another tab with unsaved changes, the portal will prompt you to confirm.
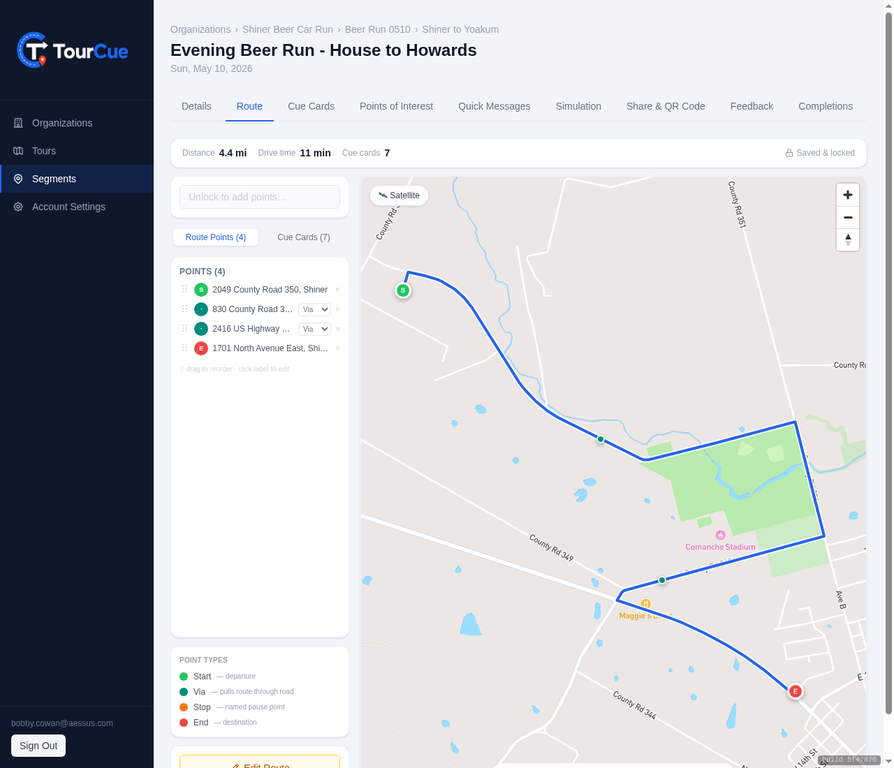
Route Builder
The Route tab is the heart of TourCue. Here you build the exact path your convoy will follow, and the platform generates turn-by-turn cue cards automatically from your route.
Building a Route
- 1
Search for a starting point
Type an address or place name in the search box at the top of the sidebar. Click a result to add it as a waypoint.
- 2
Add intermediate stops
Search and add as many waypoints as needed. The route updates live after each addition, following real roads via Mapbox Directions.
- 3
Reorder waypoints
Drag the handle on any waypoint in the sidebar list to reorder it. The route recalculates immediately.
- 4
Reshape the route
Drag the blue route line on the map to reshape any segment. This adds a new waypoint at the drag point.
- 5
Set waypoint types
Each waypoint can be marked as a Stop (a deliberate pause point) or a Pass-through (a navigation point only). Stops are shown to participants as destinations.
- 6
Save the route
Click Save Route (or press Ctrl+S / Cmd+S). The route locks and cue cards are generated automatically.
Route Stats Bar
A stats strip above the map shows the total distance (miles), estimated drive time, and number of stops whenever a route is calculated. This updates live as you add or move waypoints.
Route Lock
Once a route is saved, it locks automatically. This protects your cue cards — editing the route will regenerate all cue cards and clear any custom landmark callouts you've added. Always finish the route before customizing cue cards.
To make changes to a saved route, click Edit Route. A confirmation dialog will warn you that cue cards will be regenerated. Click Unlock to proceed, make your changes, then save again.
Map Controls
Keyboard Shortcuts
Cue Cards
Cue cards are the turn-by-turn instructions that appear on participants' screens as they drive. They are generated automatically from your route, but every card is fully editable.
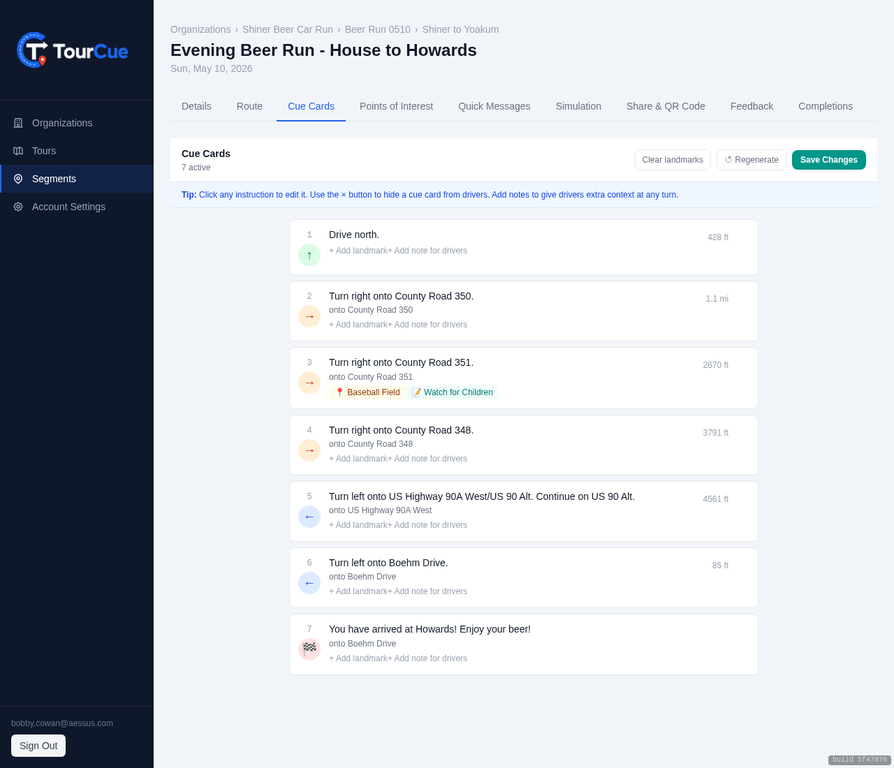
What's on a Cue Card
Turn icon
Visual arrow showing the direction (left, right, straight, U-turn, etc.)
Instruction
The road name and maneuver (e.g., "Turn left onto US-290 West")
Distance
Distance from the previous cue to this one
Landmark
Optional callout text shown below the instruction (e.g., "Gas station on the right")
Driver note
Private note only visible to the Lead Car navigator, not participants
Hidden
Toggle to suppress a card from appearing during navigation
Editing a Cue Card
- 1
Click any cue card
The card expands to show editable fields — instruction text, landmark, and driver note.
- 2
Edit the instruction
The auto-generated instruction can be rewritten entirely. For example, change "Turn left onto TX-16 South" to "Turn left at the blinking light onto 16 South".
- 3
Add a landmark
Type a short callout that appears below the instruction on the participant's screen. Useful for visual confirmation ("Red barn on the left", "Railroad crossing ahead").
- 4
Add a driver note
Notes are only visible to the Lead Car navigator in the app. Use for hazard warnings, timing cues, or reminders.
- 5
Save changes
Click Save Changes at the top of the cue card editor to persist all edits.
Regenerate Cue Cards
If you need to reset the cue cards to match the current route (for example, after making route edits), click ↺ Regenerate in the cue card editor header. This re-fetches directions from Mapbox and rebuilds all cards from scratch.
Regenerating will reset any custom instruction text you've written. Landmark callouts and driver notes at matching step positions are preserved where possible, but it's best to finalize the route before customizing cue cards.
Clear All Landmarks
The Clear landmarks button (visible when any card has a landmark) removes all landmark callouts at once. A confirmation dialog shows the count before clearing. You must click Save Changes to persist the removal.
Points of Interest
Points of Interest (POIs) are map markers that participants see on their screen as they approach. Use them for fuel stops, photo opportunities, hazards, scenic overlooks, or any notable location along the route.
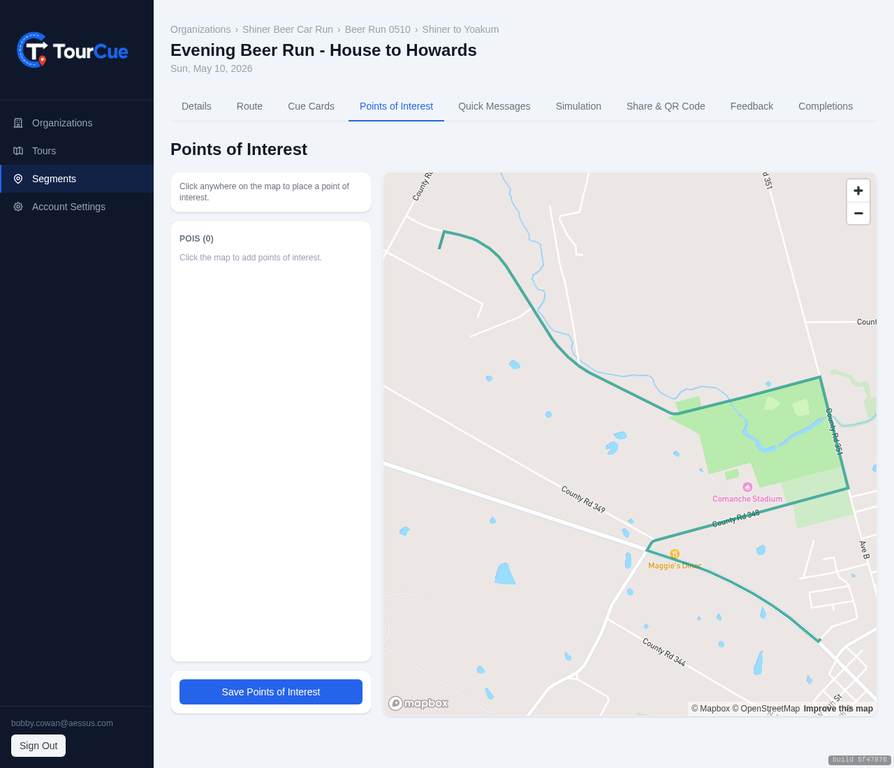
Adding a POI
- 1
Open the Points of Interest tab
The map loads with your full route drawn in teal, so you can see exactly where the convoy will travel.
- 2
Click anywhere on the map
A new POI marker is dropped at that location. A form appears to name it and add a description.
- 3
Name the POI
Give it a short, descriptive name — "Fuel Stop", "Photo Op — Overlook", "Caution: Railroad Crossing".
- 4
Add a description (optional)
Additional context shown when participants tap the POI marker on their screen.
- 5
Save
Click Save to persist the POI. It will appear on all participants' maps during the event.
Place POIs slightly before the actual location — participants are moving, so a 0.1–0.2 mile heads-up gives them time to react.
Quick Messages
Quick Messages are pre-configured broadcast buttons that the Lead Car navigator can tap during the event to instantly notify all participants. No typing required — just one tap.
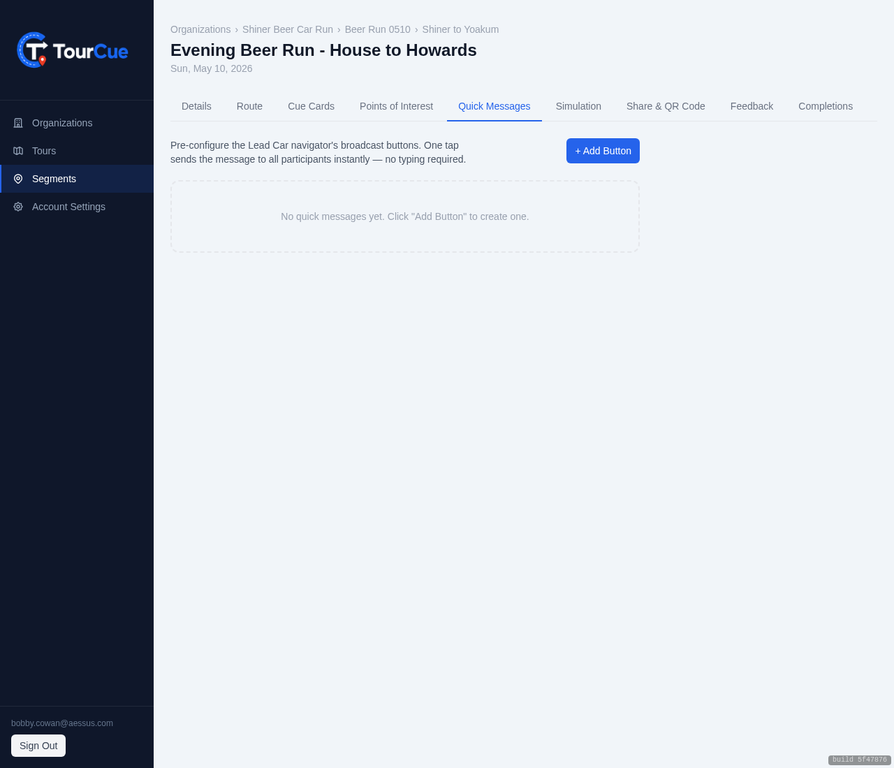
Setting Up Messages
- 1
Click Add Message
A new message slot appears in the list.
- 2
Write the message text
Keep it short and action-oriented — participants see it as a banner on their screen while driving. Examples: "Fuel stop in 2 miles", "Slow down — road hazard ahead", "Photo stop — pull over safely".
- 3
Save
Messages are saved to the event and available to the Lead Car navigator during the run.
Set up 4–6 messages covering the most common scenarios: fuel stops, pace changes, photo opportunities, and emergency holds. The Lead Car navigator can tap these one-handed without taking their eyes off the road for long.
During the Event
The Lead Car navigator sees the Quick Message buttons on their navigation screen. Tapping one sends the message to every active participant immediately. The message appears as a dismissible banner on each participant's screen.
Simulation
The Simulation tab lets you test-drive the participant experience from your desk before the event. Watch the blue dot travel the route, see cue cards fire at each turn, and verify every instruction reads correctly.
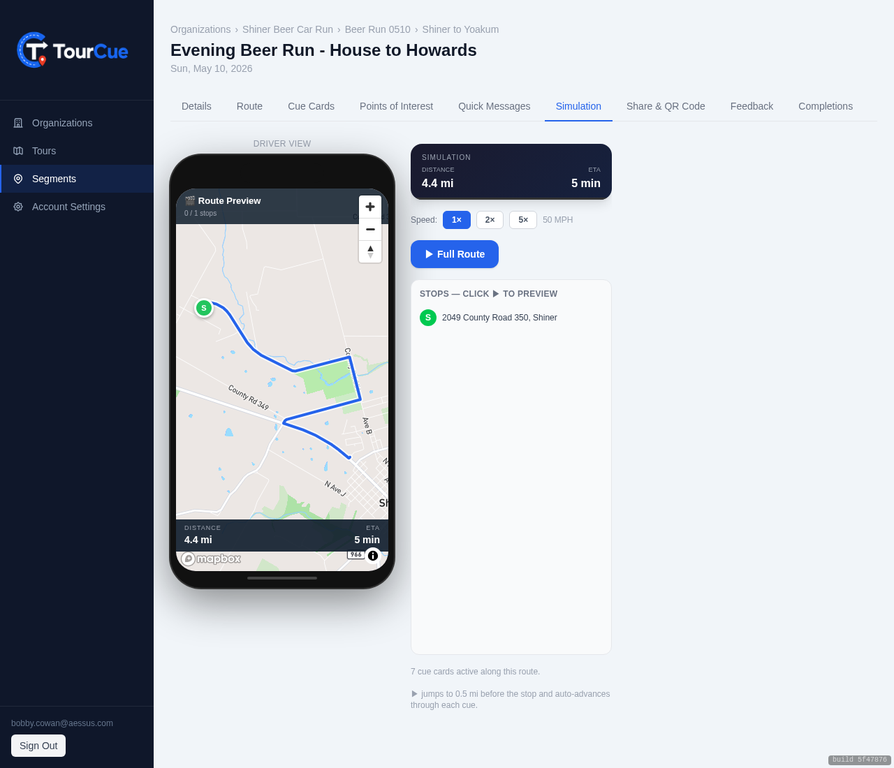
Running a Simulation
- 1
Open the Simulation tab
The map loads with your route and a driver view panel on the right showing the participant screen.
- 2
Click Full Route ▶
The simulation starts from the beginning of the route. The blue dot begins moving along the polyline.
- 3
Watch cue cards fire
As the dot approaches each turn, the cue card appears in the driver view panel — exactly as participants will see it on their phones.
- 4
Adjust speed
Use the 1×, 2×, or 5× speed controls to move through the route faster. 5× is useful for long routes.
- 5
Pause and resume
Click the pause button at any time to stop the simulation and inspect a specific cue card or map position.
The simulation uses the same cue card firing logic as the live app. If a cue card fires at the wrong location or the instruction reads incorrectly, go back to the Cue Cards tab to edit it before the event.
What to Check
Share & QR Code
The Share & QR Code tab is how participants join the event. Display the QR code at your driver's meeting, or send the link via SMS. No app download required — participants open it in their phone's browser.
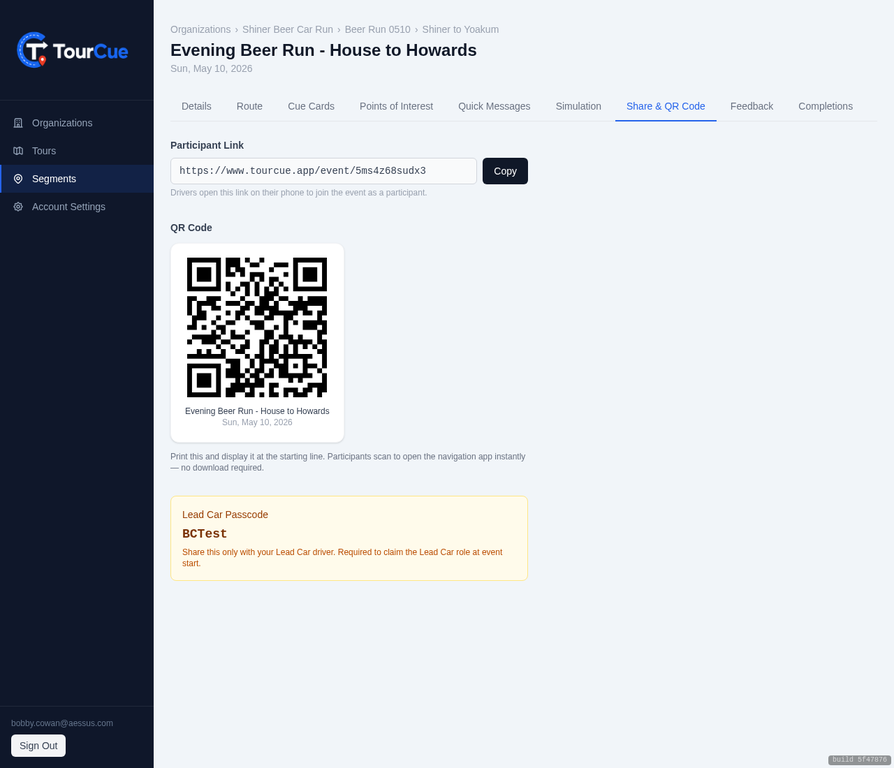
Sharing Options
QR Code
Print the QR code or display it on a screen at your driver's meeting. Participants scan it with their phone camera and are immediately on the route.
Participant Link
Copy the link and send it via SMS, email, or your club's group chat. The link opens directly in the participant's browser — no account, no download.
Lead Car Passcode
Share this separately and privately with your designated Lead Car navigator. They enter it in the app to claim the Lead Car role, which enables Quick Message broadcasting and position sharing.
Print the QR code on a half-sheet and tape it to the sign-in table at your driver's meeting. Most participants can scan and join in under 10 seconds.
Feedback
The Feedback tab collects bug reports and comments submitted by participants during the event. If a driver encounters a problem — wrong turn instruction, off-route detection issue, or app behavior — they can submit a report directly from the app.
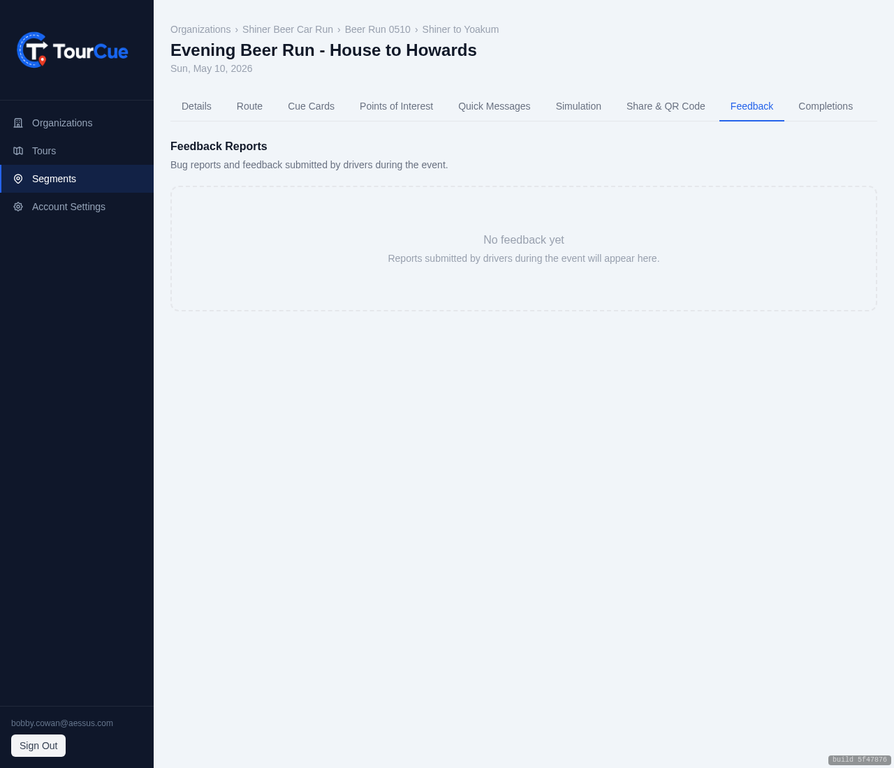
Feedback reports include the participant's position at the time of submission, which helps diagnose route or cue card issues at specific locations.
Completions
The Completions tab shows participants who have finished the segment, listed in order of finish. This is useful for tracking who has arrived at the destination and for recognizing top finishers at the event.

A participant is marked as complete when they tap "Arrived" on their navigation screen at the final destination. The timestamp and car number are recorded.
Tips & Shortcuts
Keyboard Shortcuts
| Shortcut | Action | Where |
|---|---|---|
CtrlS | Save route | Route Builder |
Esc | Re-lock route / dismiss modal | Route Builder |
Best Practices
Finalize the route before editing cue cards
Route changes regenerate all cue cards. Build and save the route first, then customize the cue cards. This saves time and avoids losing your edits.
Use landmarks for visual confirmation
Drivers are more confident when the cue card matches what they see out the window. Add landmark callouts like "Water tower on the left" or "Turn at the blinking light" for tricky intersections.
Always run the simulation before the event
The simulation takes 5 minutes and catches issues that are hard to spot in the cue card list — wrong firing order, missing turns, or confusing instructions.
Send the link in advance
Share the participant link 24 hours before the event so drivers can pre-load the route. This avoids connectivity issues at the starting location.
Keep the Lead Car passcode private
The passcode grants the Lead Car role, which enables Quick Message broadcasting. Only share it with your designated Lead Car navigator.
Use POIs for fuel stops
Mark fuel stops as POIs so participants can see them on the map before they arrive. Include the brand name and any relevant notes in the description.
TourCue Organizer Portal Documentation · tourcue.net · Open Portal